A while ago I found out about home binding machines through an unrelated search on Amazon. Originally I saw The Cinch, a high end expensive home binding machine. It had great reviews but the price was more than I had to spend on a fun little thing (it sells for between $65 and $110, depending where you buy it). It has a lot of options and looked very easy to use.
Through some research I found many scrabooking communities, since they are the main audience for at home binding. I found a lot of people asking if they should get the Bind-It-All or the Cinch, and surprisingly there was no consensus! People liked both of them a lot, and that brought me to Zutter's page.
The Bind-It-All, version 2, is what they sell new for $60, better than the price of the Cinch, but still an investment. At the time though, I was lucky enough to see that at the bottom of their page they were still selling their version 1 of the Bind-It-All. It didn't have all the features of the version 2, but for $30 I certainly couldn't complain. So on a whim, I ordered one along with some metal rings for the binding and all together it came out just under $50.
It's a very reasonably sized machine, which was one complaint about the Cinch, that it took up a lot of space. It's light and although it looks a little confusing at first, if you just follow the little instructions book that it comes with it's incredibly easy to figure out its functions.
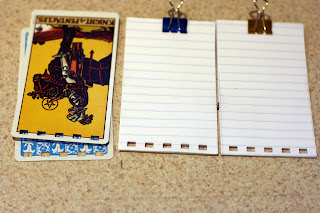
My test projects were making little card notebooks. I used some tarot cards and notebook paper.
I used my matt cutter to cut the stacks of paper to the right size, there's probably a better way to do this!
The paper is all cut down to size!
It took me a little doing to get the holes in the right places, if you're doing less than six holes I found it a little tricky to get everything even. I also had to punch half the pages at a time, and the two cards at the same time. The Bind-It-All V1 has a fairly limited width that it can punch through, which it looks like the Cinch can accommodate more thickness with less effort pushing on the handle.
The wires are pretty cheap, so I got some cute pink ones. You just hook them through...
Put the wires in the machine, and clamp them shut! It's the most fun part for me, I like doing it, and it makes a nice professional little set of rings.
And all done! I like it a lot, it's fun to make little notebooks and I'm sure you could make much larger things too. As for usefulness? Not as useful as I thought it would be, so I'm glad I only spent $30 on this one. If you think you would like making your own spiral notebooks though it's great, and I'm sure scrabookers love it :)
Monday, December 31, 2012
Sunday, December 2, 2012
Thursday, November 29, 2012
Expensive Paper
In a moment of weakness I decided that yes, I might in fact like some nice paper to make books out of! A long time ago now I made myself a sketchbook out of pokemon cards, and although it wasn't anything special, it really got me in to the idea of making my own sketch books.
I've always been fairly dissatisfied with store bought ones, only because I don't tend to prefer carrying around something that seemed very 'sterile' and not like me. Even if you tape something over the cover it didn't always feel like 'mine'. By making my own sketch books I really feel connected and proud of it, even if the drawings inside aren't that great x)
I ordered all this paper from DickBlick.com
Their prices I found to be good, and they had a pretty good selection of decorative and hand made papers. They took me in with a free shipping offer if I ordered over a certain amount, which was nice because some of the paper I ordered was over sized for normal shipping options.
I got taken in by a listing for 1lb of assorted paper for $9, thinking it might be nice to put inside the covers, and some of them will definitely work! There's a good assortment of weights and colors.
I bought some smaller packs of hand made paper to use for pages. They have the natural deckle edge that hand made paper has, I think it will give the books a ton of character! It's cotton paper, and came in so many colors I couldn't help but but a few different kinds, I'm excited to try making a book with black pages. They were about $2.50 for a pack of five.
These are all the large sheets of paper that I got. The big pages are so expensive, but almost incomparable to the small ones. The prints are just great, some using especially thick ink that it's almost like it's embossed. My photo doesn't show it well, but the teal and blue papers have gold paint on them and shines in the light.
I like it all so much, I don't even feel like I want to use it for anything x)
Thursday, November 15, 2012
Toralei Painting
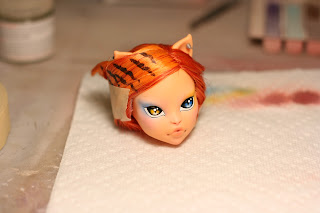
Progress photos of a Toralei I painted today!
Blank.
White highlight.
Blush.
Eyeshadow.
First layer eye whites.
Black pastel in nose and corners of lips.
Second layer of white on eyes.
Eyeliner.
Iris color.
Shadowing in the eyes.
Blending...
Blending...
More blending...
Eye highlights.
Pink inside the eyelid.
Eyelashes.
Eyebrows.
Last pastel details, just seal and add gloss!
Wednesday, November 7, 2012
Lagoona Repaint
I rerooted and repainted a Lagoona the other day!
Blank!
White highlights.
Blue blush.
Layer one on the whites of the eyes.
I taped her hair back at this point because it kept getting into the wet paint of her eyes =T Layer two of white on the eyes.
Eyeliner.
Iris color.
Painting in the beginnings of shading.
Blending.
Blending.
More blending! It take the most amount of time.
Eye shine.
Tear ducts and evening up the eyeliner.
Added some pastel in the nostrils and corners of the lips, painted upper eyelashes.
Lower eyelashes.
Eyebrows.
Final pastel details, lipliner, nose crease etc.
Sealed and glossed, all finished!
Subscribe to:
Posts (Atom)


